
A Fun, Budget-Friendly Way to Brighten Your Kid’s Bedroom!
Transform your child’s bedroom with a vibrant, geometric accent wall that’s as fun to create as it is to admire! This budget-friendly project uses simple materials and a splash of creativity to add a playful, modern vibe to any space.
Follow these steps for a stunning result that’s easy enough for DIY beginners!
What You’ll Need:
-Warm water and a damp rag
-Painter’s tape (high-quality recommended)
-Drop cloths or old newspapers
-Screwdriver (for removing outlet covers)
-Latex paint in 3–4 complementary colors (tester cans or quart-sized cans are perfect and affordable!)
-Paintbrushes or small rollers
-A smartphone with a photo-editing app (for planning)
*Optional: Base coat paint (for sealing tape edges)
Step 1: Prep the Wall (Day Before)
Start with a clean canvas! The day before painting, wipe down the wall with a warm, damp rag to remove dust, dirt, or smudges. This ensures the painter’s tape sticks properly and your colors pop. Remove outlet covers with a screwdriver for a polished finish. Protect your floors by laying down drop cloths or old newspapers—trust us, this saves cleanup time!
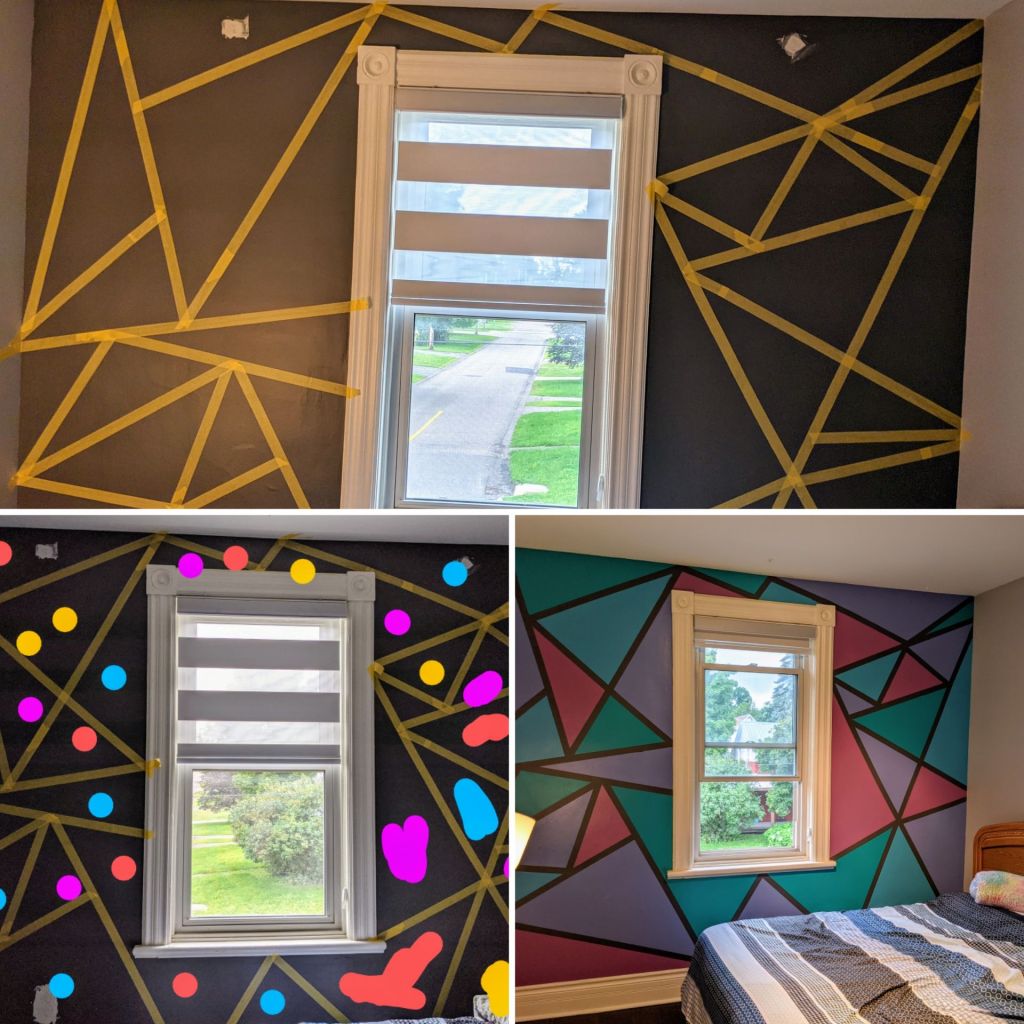
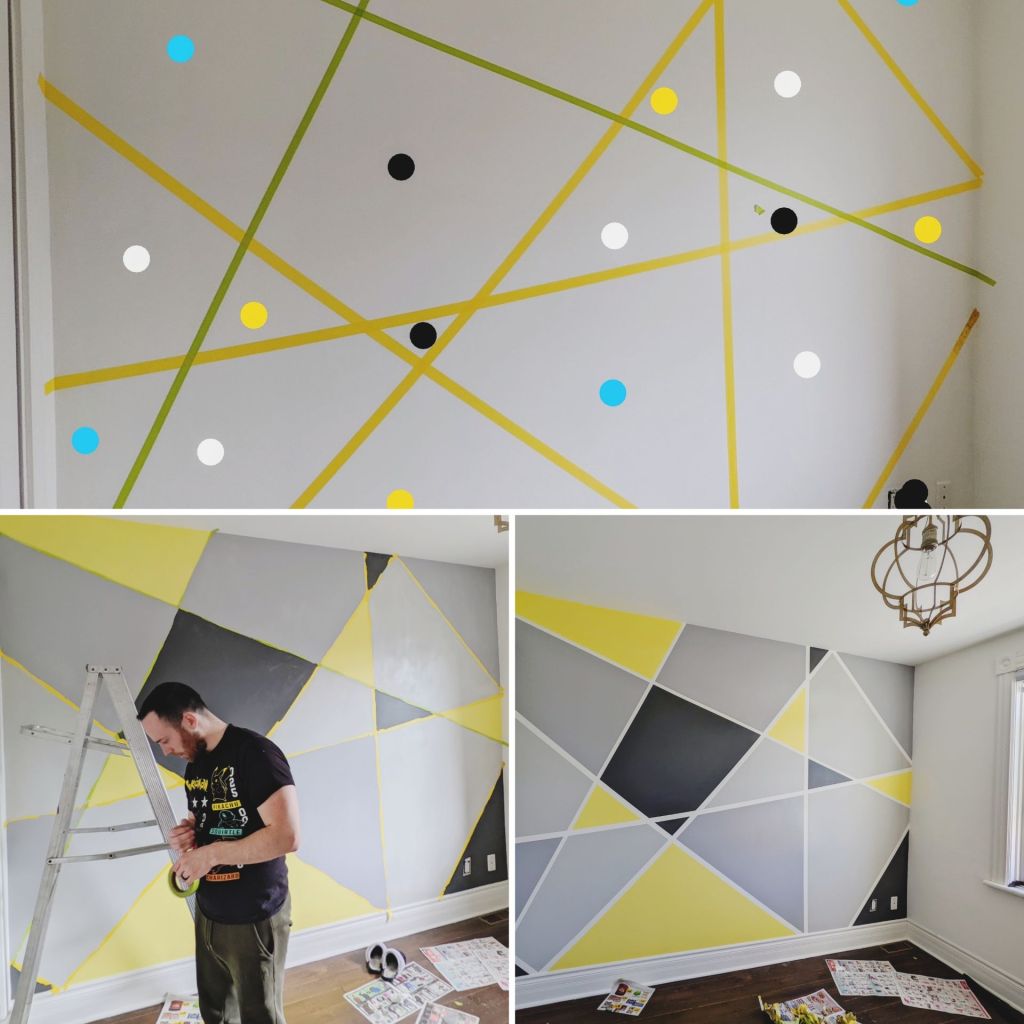
Step 2: Tape Your Geometric Design
Use painter’s tape to create a geometric pattern, like triangles, on the wall. Don’t stress about perfection—aim for shapes that are roughly even but embrace the charm of slight imperfections. Apply the tape slowly, pressing firmly to ensure it adheres fully to the wall.
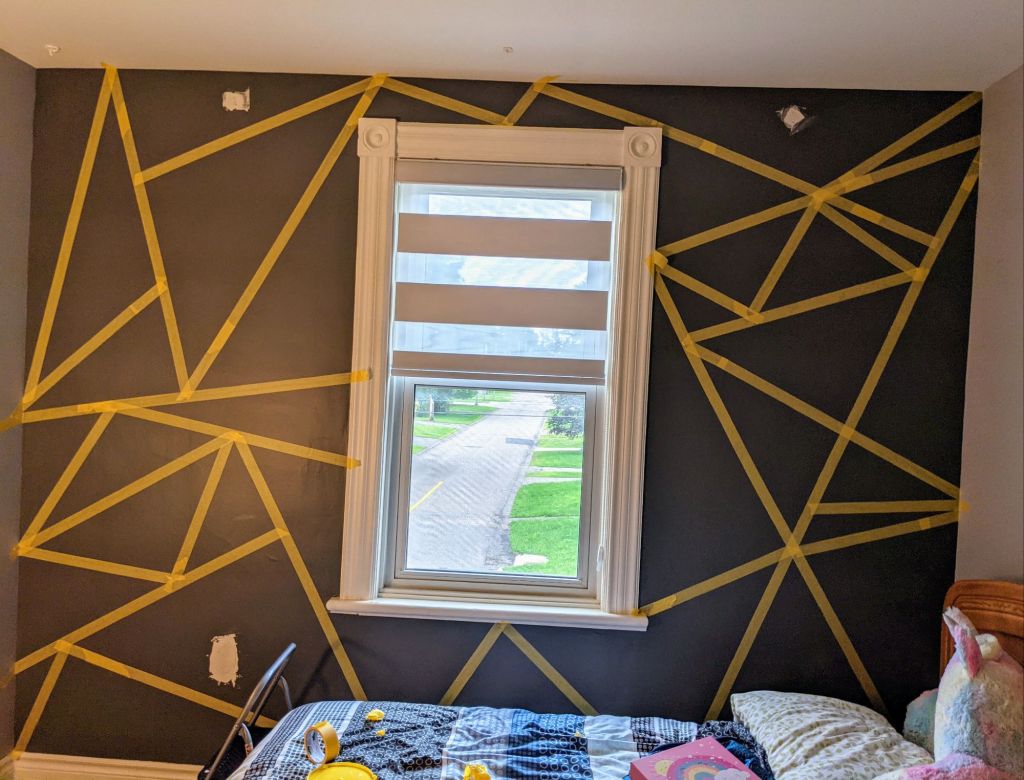
Pro Tip: To prevent paint bleeding, you can “seal” the tape edges by brushing a thin layer of the wall’s original base color over them. Let it dry before painting your colors. (We skipped this step with high-quality tape and a well-prepped wall, and it worked great!)
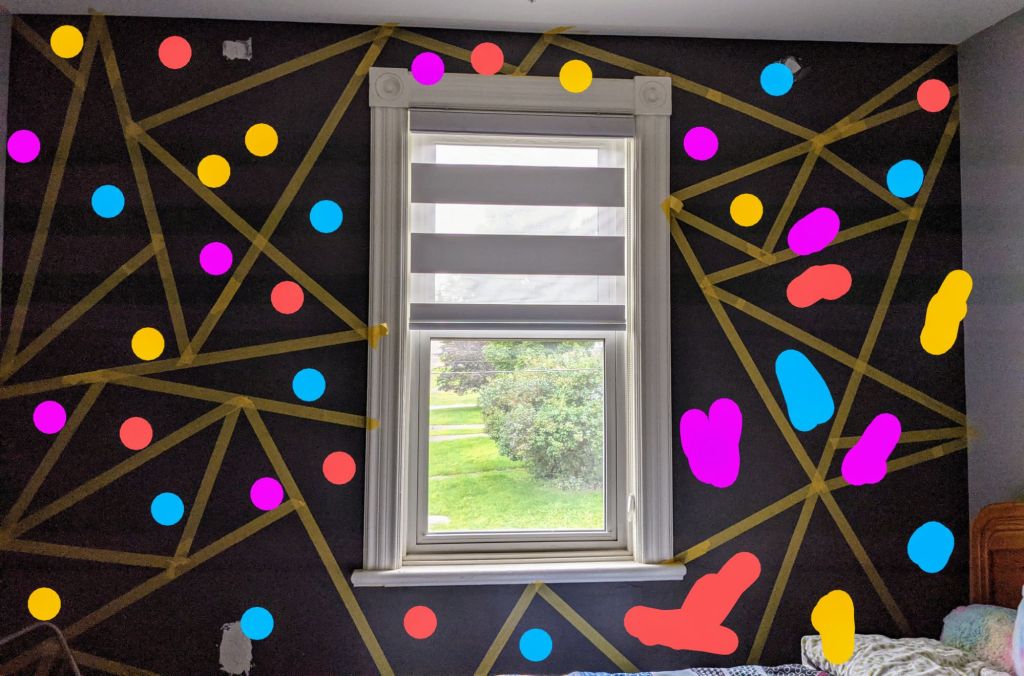
Step 3: Choose Your Colors
Pick 3–4 complementary latex paint colors that match your child’s room theme. Latex paint is durable, easy to clean, and perfect for kid-friendly spaces. Save money by opting for small tester cans or quart-sized paints—more than enough for an accent wall!
To plan your layout, snap a photo of the taped wall with your phone. Use your photo editor’s markup tool to sketch out color placement. Play around until you’re happy with the look, ensuring no two same-colored shapes touch for a balanced look.
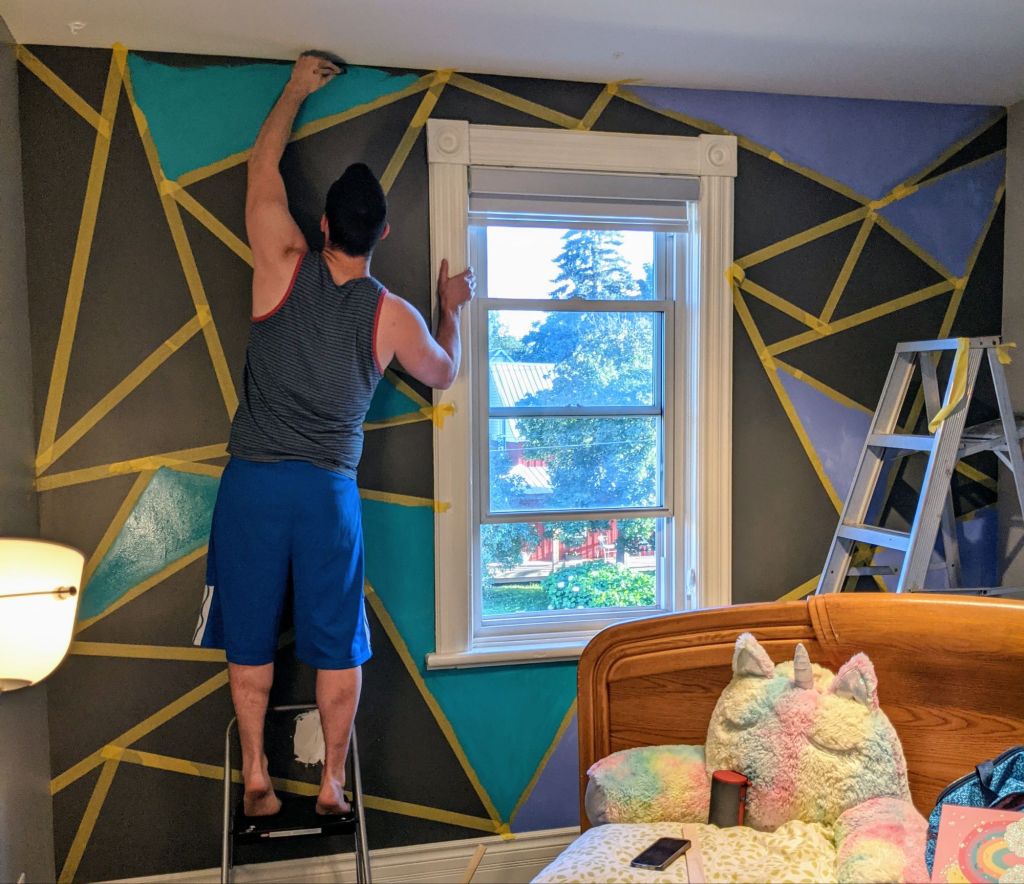
Step 4: Paint the Wall
Now for the fun part—painting! Grab a brush or small roller and fill in each taped section with your chosen colors. Work carefully to stay within the lines, but don’t worry if it’s not perfect; the tape will help keep things crisp. Apply two coats of paint over the course of 2 days.
Optional: If painting isn’t your thing, pass the brush to a partner or family member (like I did with my husband!).
Step 5: Let It Dry
Patience is key! Let the paint dry for 2–3 days to ensure it’s fully set. This prevents smudging when you remove the tape.
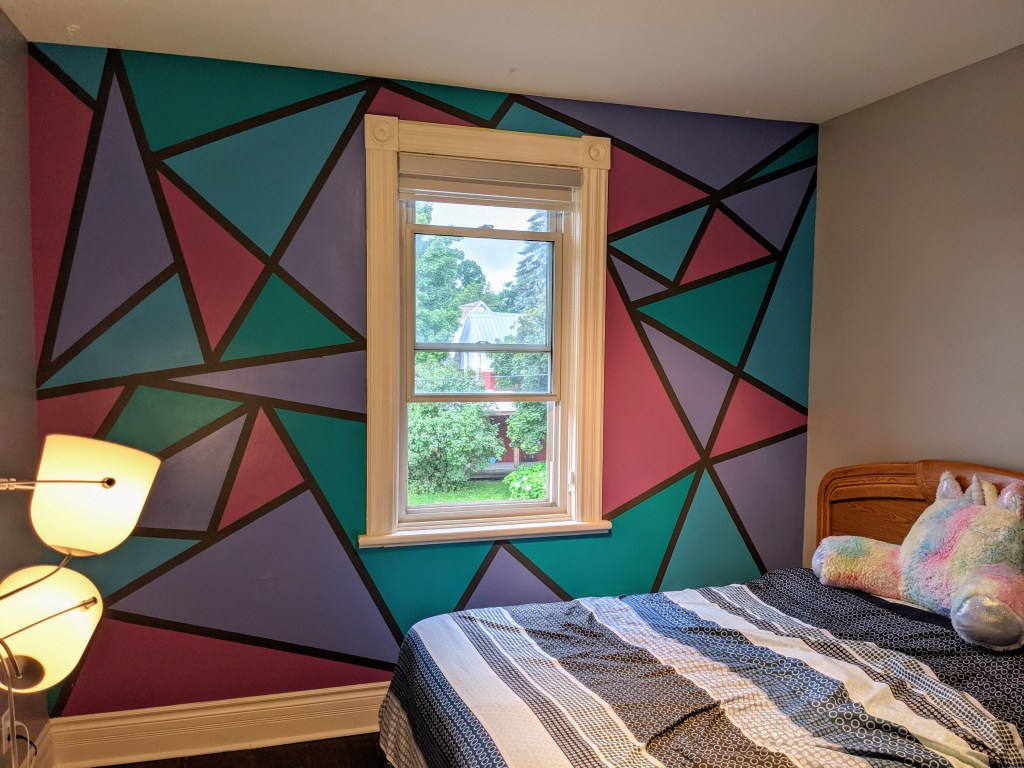
Step 6: Reveal the Magic
The most satisfying part? Peeling off the painter’s tape! Pull it off slowly at a 45-degree angle to reveal sharp, clean lines. Step back and admire your bold, geometric accent wall—a vibrant masterpiece that adds a fun twist to your child’s room!
Enjoy Your Creation!
Your new accent wall will bring a burst of personality to your kid’s bedroom, creating a space they’ll love. Bonus: It’s a budget-friendly project that’s as rewarding to make as it is to show off!
Tips for Success:
•Invest in good-quality painter’s tape to avoid bleeding.
•Test your colors on a small piece of cardboard first to ensure they work together.
•Have fun with the process—turn on some music and make it a family project!
Happy painting, and enjoy your stunning new accent wall! 🎨
P.S. Our kids still sleep in our room, so their awesome new accent wall is mostly for show—how relatable is that? 😄


Leave a comment